
Bees & Bombs
Rebuilding a gif from Bees & Bombs
Tutorials>Checkmark
Checkmark
In this tutorial I’ll show you how to create the following check mark animation using C4.
Creating our Paths
After a brainstorm session with Jake and Travis, we determined that in order to accomplish this animation we would need three shapes.

The shapes were designed in Illustrator and then translated to paths using PaintCode. With the paths in Xcode it was just a matter of timing the animations.
If you haven’t already done so, install C4 by following the instructions on our install tutorial. The easiest is to use the first option.
Create a new C4 Project
Bezier1
In your project’s WorkSpace, start by creating a class variable to use as your first shape. In setup(), change the canvas.backgroundColor to C4Purple, initialize your shape and add it to the canvas, like this:
1
2
3
4
5
6
7
8
9
10
11
12
13
14
15
16
17
18
19
20
21
22
23
24
25
26
27
28
29
class WorkSpace: CanvasController {
    var b1: Shape!

    override func setup() {
        canvas.backgroundColor = C4Purple
        b1 = createBezier1()
        canvas.add(b1)
    }

    func createBezier1() -> Shape {
        let bezier = UIBezierPath()
        bezier.moveToPoint(CGPointMake(177.2, 30.4))
        bezier.addCurveToPoint(CGPointMake(103.8, 0), controlPoint1: CGPointMake(158.4, 11.6), controlPoint2: CGPointMake(132.5, 0))
        bezier.addCurveToPoint(CGPointMake(0, 103.8), controlPoint1: CGPointMake(46.5, 0), controlPoint2: CGPointMake(0, 46.5))
        bezier.addCurveToPoint(CGPointMake(103.8, 207.6), controlPoint1: CGPointMake(0, 161.1), controlPoint2: CGPointMake(46.5, 207.6))
        bezier.addCurveToPoint(CGPointMake(207.6, 103.8), controlPoint1: CGPointMake(161.1, 207.6), controlPoint2: CGPointMake(207.6, 161.1))
        bezier.addCurveToPoint(CGPointMake(177.2, 30.4), controlPoint1: CGPointMake(207.6, 75.1), controlPoint2: CGPointMake(196, 49.2))
        bezier.addLineToPoint(CGPointMake(69.2, 138.4))

        let path = Path(path: bezier.CGPath)
        let shape = Shape(path)
        shape.fillColor = clear
        shape.lineWidth = 2.0
        shape.strokeStart = 0.0
        shape.strokeEnd = 0.81
        shape.strokeColor = C4Blue
        return shape
    }
}
In the code above, the
bezier.moveToPoint,bezier.addLineToPoint,bezier.addCurveToPointetc. are generated from PaintCode.
PaintCode exports UIBezierPath code. To change the UIBezierPath into a Shape, I created a Path using the bezier.CGPath and then initialized a Shape from this path.
Now you can manipulate all the properties of Shape to achieve your desired animation.
Bezier2 and 3
Add two more Shape class variables and their createBezier functions. Below your b1 class variable add:
1
2
var b2: Shape!
var b3: Shape!
Then in the body of your class add:
1
2
3
4
5
6
7
8
9
10
11
12
13
14
15
16
17
18
19
20
21
22
23
24
25
26
27
28
29
30
31
32
33
34
35
36
37
func createBezier2() -> Shape {
    let bezier = UIBezierPath()
    bezier.moveToPoint(CGPointMake(90.9, 138.4))
    bezier.addLineToPoint(CGPointMake(10.6, 58.1))
    bezier.addCurveToPoint(CGPointMake(0, 103.8), controlPoint1: CGPointMake(3.8, 71.9), controlPoint2: CGPointMake(0, 87.4))
    bezier.addCurveToPoint(CGPointMake(103.8, 207.6), controlPoint1: CGPointMake(0, 161.1), controlPoint2: CGPointMake(46.5, 207.6))
    bezier.addCurveToPoint(CGPointMake(207.7, 103.8), controlPoint1: CGPointMake(161.1, 207.6), controlPoint2: CGPointMake(207.7, 161.1))
    bezier.addCurveToPoint(CGPointMake(103.9, 0), controlPoint1: CGPointMake(207.7, 46.5), controlPoint2: CGPointMake(161.3, 0))
    bezier.addCurveToPoint(CGPointMake(10.7, 58.1), controlPoint1: CGPointMake(63, 0), controlPoint2: CGPointMake(27.6, 23.7))

    let path = Path(path: bezier.CGPath)
    let shape = Shape(path)
    shape.fillColor = clear
    shape.lineWidth = 2.0
    shape.strokeStart = 0.0
    shape.strokeEnd = 0.06
    shape.strokeColor = C4Blue
    return shape
}

func createBezier3() -> Shape {
    let bezier = UIBezierPath()
    bezier.moveToPoint(CGPointMake(138.4, 138.4))
    bezier.addLineToPoint(CGPointMake(30.4, 30.4))
    bezier.addCurveToPoint(CGPointMake(0, 103.8), controlPoint1: CGPointMake(11.6, 49.2), controlPoint2: CGPointMake(0, 75.1))
    bezier.addCurveToPoint(CGPointMake(42, 187.2), controlPoint1: CGPointMake(0, 138), controlPoint2: CGPointMake(16.5, 168.3))
    bezier.addLineToPoint(CGPointMake(160, 69.2))

    let path = Path(path: bezier.CGPath)
    let shape = Shape(path)
    shape.fillColor = clear
    shape.lineWidth = 2.0
    shape.strokeStart = 0.804
    shape.strokeEnd = 1.0
    shape.strokeColor = C4Blue
    return shape
}
Easy, now we’ve got code for all three shapes.
Setup the shapes
Finally, change your setup() function to look like this:
1
2
3
4
5
6
7
8
9
10
11
12
override func setup() {
    canvas.backgroundColor = C4Purple

    b1 = createBezier1()
    b2 = createBezier2()
    b3 = createBezier3()

    b1.center = canvas.center
    b1.add(b2)
    b1.add(b3)
    canvas.add(b1)
}
Create your new shapes the same way as your first. Then add them to that shape.
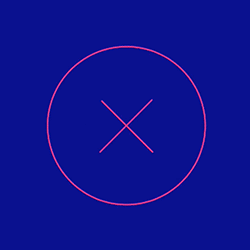
Try running the app now and you should see something that looks like this:

In the createBezier() functions, each shape has their strokeStart and strokeEnd properties set, which is why you see the checkmark rather than a bunch of clashing lines.
The majority of the time we spent on this example was in finding the right balance of positions and timing for the shapes.
If we didn’t set the proper end points, you would see this:

Animations
To get the effect we’re looking for in this animation your shapes’ strokeColor, strokeStart and strokeEnd properties need to be manipulated in a ViewAnimation.
animate(color:)
We know that each shape is going to animate from C4Blue to C4Pink, and back, so we create a method that allows us to sync those transitions.
Adding these class variables to your WorkSpace:
1
2
3
var x = false
let d = 0.5
let dc = 0.25
The boolean, x, will be used to track if your shapes are in their x state or not. The other two constants will be used for timing your animations.
Add the following function to the body of your class:
1
2
3
4
5
6
7
8

func animate(color: Color) {
    ViewAnimation(duration: d + dc) {
        self.b1.strokeColor = color
        self.b2.strokeColor = color
        self.b3.strokeColor = color
    }.animate()
}
This function takes a Color as a parameter and animates each shape’s strokeColor.
Tapping to Animate
To trigger the animations, add a tap gesture to your canvas so you can start interacting with your app. In setup(), add the following:
1
2
3
4
5
6
7
8
canvas.addTapGestureRecognizer { locations, center, state in
    if self.x {
        self.animate(C4Blue)
    } else {
        self.animate(C4Pink)
    }
    self.x = !self.x
}
This tap gesture will check to see if your boolean x is true or false and change the color of your shapes accordingly. self.x = !self.x will change x to whatever it is not. So, if x is true x is now false.
Start/End Point Animations
Now, we’re going to create the animations for setting the strokeStart and strokeEnd properties of each shape.
####Bezier1 Add these class variables to your project:
1
2
var b1ToX: ViewAnimation!
var b1ToCheck: ViewAnimation!
Moving from “check” state to “X” state and vice-versa requires animations. So, add the following function to the body of your class:
1
2
3
4
5
6
7
8
9
10
11
12
13
14
15
16
17
18
19
20
21
22
23
24
25
26
27
28
29
func createB1Animations() {
    b1ToX = ViewAnimation(duration: d) {
        self.b1.strokeStart = 0.6
    }
    b1ToX.curve = .EaseIn

    b1ToX.addCompletionObserver { () -> Void in
        let a = ViewAnimation(duration: self.dc) {
            self.b1.strokeStart = 0.88
            self.b1.strokeEnd = 1.0
        }
        a.curve = .EaseOut
        a.animate()
    }

    b1ToCheck = ViewAnimation(duration: d) {
        self.b1.strokeStart = 0.6
        self.b1.strokeEnd = 0.81
    }
    b1ToCheck.curve = .EaseIn
    b1ToCheck.addCompletionObserver { () -> Void in
        let a = ViewAnimation(duration: self.dc) {
            self.b1.strokeStart = 0.0
        }
        a.curve = .EaseOut
        a.animate()
    }

}
In this function, you’re initializing animations that will transition the first bezier betwen its x and check states. In both cases, the animation is a two-step process, the second part of which is triggered immediately after the first ends. Adding a completion observer to each of the first animations triggers the second step.
Bezier2 and 3
The steps for creating the animations for your other shapes are the same as the steps for your first shape. This next bit should look familiar.
Add these class variables:
1
2
3
4
5
var b2ToX: ViewAnimation!
var b2ToCheck: ViewAnimation!

var b3ToX: ViewAnimation!
var b3ToCheck: ViewAnimation!
Add the following functions to your WorkSpace:
1
2
3
4
5
6
7
8
9
10
11
12
13
14
15
16
17
18
19
20
21
22
23
24
25
26
27
28
29
30
31
32
33
34
35
36
37
38
39
func createB2Animations() {
    b2ToX = ViewAnimation(duration: d) {
        self.b2.strokeStart = 0.15
        self.b2.strokeEnd = 0.21
    }
    b2ToX.curve = .EaseIn
    b2ToX.addCompletionObserver { () -> Void in
        let a = ViewAnimation(duration: self.dc) {
            self.b2.strokeEnd = 1.0
        }
        a.curve = .EaseOut
        a.animate()
    }

    b2ToCheck = ViewAnimation(duration: d) {
        self.b2.strokeEnd = 0.21
    }
    b2ToCheck.curve = .EaseIn
    b2ToCheck.addCompletionObserver { () -> Void in
        let a = ViewAnimation(duration: self.dc) {
            self.b2.strokeStart = 0.0
            self.b2.strokeEnd = 0.06
        }
        a.curve = .EaseOut
        a.animate()
    }
}

func createB3Animations() {
    b3ToX = ViewAnimation(duration: d) {
        self.b3.strokeStart = 0.0
        self.b3.strokeEnd = 0.19
    }

    b3ToCheck = ViewAnimation(duration: d) {
        self.b3.strokeStart = 0.804
        self.b3.strokeEnd = 1.0
    }
}
I experimented a lot with different
strokeStartandstrokeEndvalues before settling on the one’s used in this tutorial.
The last thing to do for this step is to call all of your create animations functions in setup(). So, just above the tap gesture add:
1
2
3
createB1Animations()
createB2Animations()
createB3Animations()
Pulling it all together
To make things a little more organized, create two functions that trigger the transition between the x and check states.
toX() and toCheck()
1
2
3
4
5
6
7
8
9
10
11
12
13
14
15
16
17
func toX() {
    b1ToX.animate()
    delay(0.15) {
        self.b3ToX.animate()
    }
    delay(0.3) {
        self.b2ToX.animate()
    }
}

func toCheck() {
    b2ToCheck.animate()
    delay(0.5) {
        self.b3ToCheck.animate()
        self.b1ToCheck.animate()
    }
}
The Tap Gesture
Change the tap gesture to the following:
1
2
3
4
5
6
7
8
9
10
canvas.addTapGestureRecognizer { locations, center, state in
    if self.x {
        self.toCheck()
        self.animate(C4Blue)
    } else {
        self.toX()
        self.animate(C4Pink)
    }
    self.x = !self.x
}
The logic of the gesture is the same as before, but now your toCheck() and toX() functions will be called at the appropriate times.
Fin
Run your app now and tap to see the great animation you just created. I encourage you to try new shapes and values in the animations to see what cool effects you can come up with!
Code
Grab a copy of the final code Here